 |
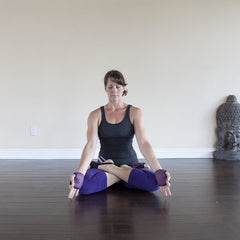
Sukhasana (Lotus Pose)
Promotes balance and harmony.
- Sit in a legs-crossed position with the soles of your feet turned upward and heels pressed against the lower side of your abdomen. Keep your spine straight.
- Place your hands on your knees, palms up. Hold as long as you wish.
- This is one of the meditative postures. It imitates an inverted lotus flower. The head is held erect and the eyes closed during this posture.
|
|
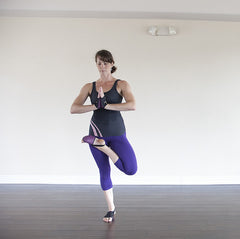
Vrkasana (Tree Pose)
This is a basic posture of balance and control. It is the foundation for good standing posture
- Place foot on standing leg (above or below the knee, never placed on the knee), toes pointed down.
- Hands overhead then brought to heart.
- Balance as long as possible. repeat opposite leg.
*Note: Advanced Tree Pose, with half lotus leg, shown here
|
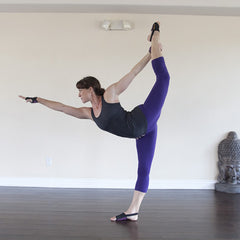 |
Natarajasana (Lord of the Dance Pose)
This improves balance, coordination and quadriceps flexibility.
- Stand in the mountain pose. Inhale slowly and raise the arm overhead.
- At the same time, lift your left ankle behind you and clasp it with your left hand. Shift your weight to the right side.
- Exhale and pull the left leg toward your body and lean forward slightly while looking forward.
- Your right arm will provide balance. Hold for 20 seconds. Slowly release and return to start. Repeat on the opposite side.
|
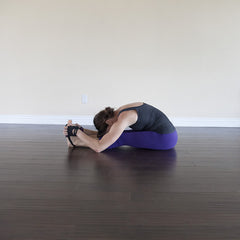 |
Paschimottanasana (Seated Forward Bend)
This increases spinal flexibility and strengthens the back.
- Get into a seated position with legs extended forward.
- Rest your hands on your thighs and straighten your spine.
- Raise your arms in front of you to shoulder level.
- Then proceed to raise them overhead, bending slightly backward.
- Bend forward to your knees.
- Grab your knees and hold the stretch for 10 seconds.
- Your head should be bent forward.
- Pull your body forward to your knees with the elbows bent outward. Hold for 10 seconds.
- Return to an upright position, place hands on thighs and relax.
|
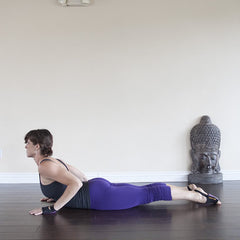 |
Bhujangasana (Cobra Pose)
This removes tension from the spine and back, strengthens and firms the abdomen and buttocks.
- Lie face down with arms at sides and head resting on either side.
- Slowly bring your head to center and rest your forehead on the floor.
- Place your hands underneath your shoulders with your fingertips facing inward.
- Tilt your head backward and begin raising your trunk. Push your hands against the floor and slowly start straightening your arms. Hold the extreme position for 10 seconds.
- Slowly tilt your head forward and lower your trunk back to start. Relax and concentrate on the feeling in the legs, back, and abdomen.
|
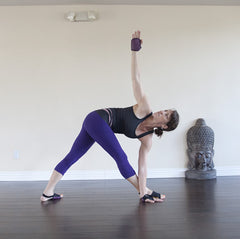 |
Parivrtta Trikonasana (Revolved Triangle Pose)
This trims the waistline and relieves tension in the neck and back.
- Stand with feet wide apart.
- Slowly raise arms to sides until they reach shoulder level. Your palms should be facing down.
- Exhale and bend, twisting until you can bring your left hand to the outside of your right foot.
- Inhale and hold the position for 20 seconds while breathing deeply and concentrating on the stretch, keeping the knees bent, if needed, to protect your hamstrings.
- Slowly straighten and return to start.
- Relax for a moment, and then repeat to opposite side.
|
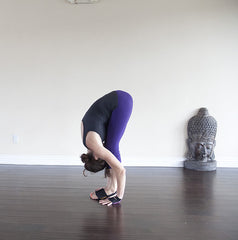 |
Uttanasana (Forward Fold)
This tones and firms the thighs and calves. It also improves hamstring flexibility.
- Stand in the Mountain Pose.
- Bend forward. Bring your arms behind your knees and clasp your hands.
- Be certain to position your hands securely behind your knees and slowly draw your upper torso down as far as comfortable. Your head should be lowered and directed toward your knees. Hold for 10 seconds.
- Lower hands to calf level. Again draw your body inward. Hold for 10 seconds.
- If you cannot grasp your hands/arms behind your knees yet, it's ok. Lower them as close to the ground as you can.
- Unclasp your hands, inhale deeply and raise your trunk back to start, one vertebra at a time.
|
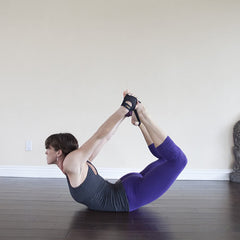 |
Dhanurasana (Bow Pose)
This shapes and tones hips, thighs, buttocks, and abdomen. It strengthens the lower back and promotes flexibility in the chest, shoulders, back, and arms.
- Lie on your stomach, arms at sides and chin resting on the floor. Bend your knees, feet together.
- Reach your arms back and grasp your ankles. Slowly raise your torso while arching your back until the abdomen bears the bodyweight. Tilt your head back and hold for 10 seconds.
- Slowly lower until chin is resting on the floor. Release your grasp and lower feet to the floor.
- Lie flat with head turned to one side. Rest and observe the feeling in the pelvic region, back, arms and legs.
|
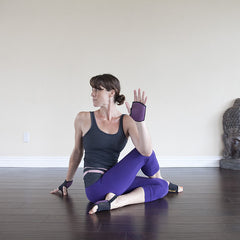 |
Ardha Matsyendrasana (Half Lord of the Fishes Pose)
This releases tension from the spine and promotes spinal flexibility.
- Sit on the floor. Place your right sole against your left thigh.
- Cross your left foot over the right knee and place the sole of your foot firmly on the floor.
- Position your left hand before you.
- Bring your right arm to your left knee and firmly grasp it.
- Slowly twist your trunk and head to the left. Your left arm will then be placed around your waist and rested on your right side. Keep your chin close to your shoulder. Hold for 10 seconds.
- Slowly move out of the posture and relax. Change leg position and repeat to other side.
|
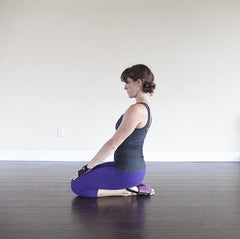 |
Vajrasana (Thunderbolt Pose)
This increases flexibility in ankle, feet, and spine. It also strengthens the abdomen and lower back.
- Sit on the back of your heels with your feet close together.
- Slowly move your arms backward, and then place them securely on the floor behind you.
- Drop your head backward while inhaling and expanding your rib cage. Arch your spine. Hold the position for 15 seconds. Walk hands forward and return to start.
- Relax for 10 seconds and repeat
|
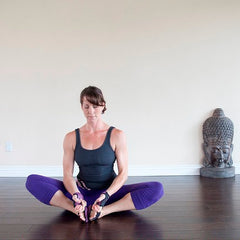 |
Baddha Konasana (Bound Angle Pose)
This firms the thighs and promotes knee and inner-thigh flexibility.
- Get into a seated position.
- Pull your heels into your groin area and grasp your big toes. Keep your spine straight.
- Slowly lower your knees.
- Hold the position for 15 seconds.
|
 |
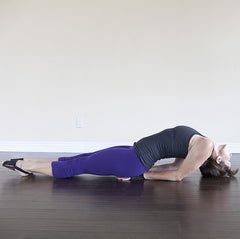
Halasana (Plow Pose)
This promotes spinal flexibility and deep relaxation of all the muscles. It also improves the functioning of the internal organs by supplying them with extra blood.
- Lie flat on your back with arms at your sides. Your palms should be facing down.
- Slowly raise your legs. Use your hands to push against the floor as you lift your trunk. Continue lifting until your legs are lowered beyond your head with your toes touching the ground as near to the head as possible.
- Once you have moved as far as comfortable, press your chin against your chest.
- Place your hands on your back with elbows on the ground. Hold for 20 seconds.
- Slowly unroll back to a lying position. Press your hands against the floor for support of your body weight.
|
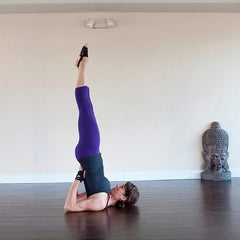 |
Salamba Sarvangasana (Shoulder Stand)
This promotes circulation in chest and neck. It is also said to stimulate the glands, in particular, the thyroid.
- Lie flat on your back.
- Place your hands at your sides, palms down, and begin to raise your legs. Press your hands against the floor to push your legs upward.
- Place your hands on hips, elbows on the ground. Try to straighten your legs and hold them upward. Your chin should be tucked in against your chest. Close your eyes and relax. Hold for 10 seconds.
- Bend your knees, release your hands, and slowly return to start, one vertebra at a time.
|
 |
Matsyasana (Fish Pose)
This loosens shoulders and hip joints and relaxes the body.
- Lie down, face up, with your legs crossed as in the Lotus posture.
- Cross arms over and around your head. Let your body weight drop naturally.
- Do not force the position. Breathe naturally and hold as long you wish.
- Change leg position and repeat.
|

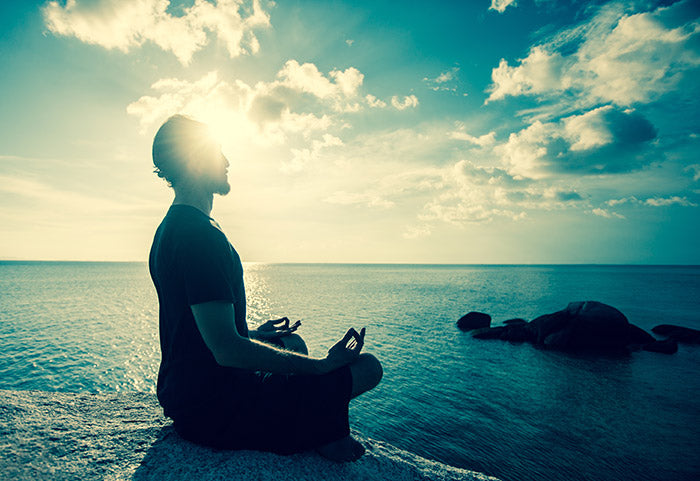
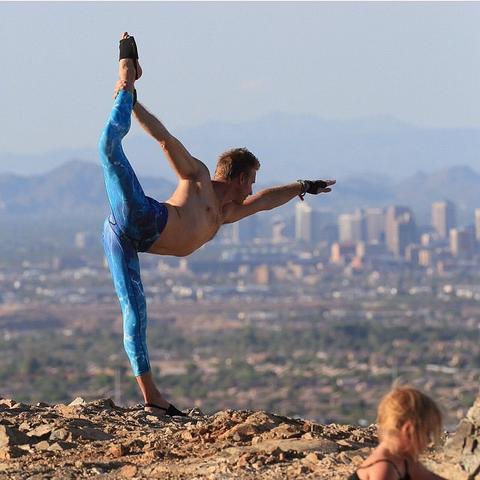
 Sometimes, yoga is just about the pose... and that's totally ok! Here we share 14 poses for the beginner to novice Yogi. These poses will stretch and strengthen your muscles while helping you to relax and develop focus.